1. Introduction to our CyberInfrastructure. Setups and key links.
Overview
Teaching: min
Exercises: minQuestions
Objectives
SEAGrid presentation
Overview of the UB CyberInfrastructure
- Set up and verify UBVPN
- User, Project, and Scratch space
- Open OnDemand
- Modules at CCR
- Conda and environments
- Using Jupyter on the OnDemand gateway
- Running interactive jobs: OnDemand Cluster Desktop
- Running interactive jobs: OnDemand Shell
- Useful References and Slidesets
0. Set up and verify UBVPN and CCR access
As a workshop participant you have been allocated a UB VPN account and a CCR account. In order to access CCR computing resources and Open OnDemand, you must be running the UB Virtual Private Network (VPN) software. Otherwise you will be unable to connect. All information you need to set up your VPN and access your CCR account has been emailed to you.
It is critical that you install the VPN software and verify your access before the workshop begins.
Your username
Workshop participants are assigned a VPN username that will be something like: ub2999. To
make it easier to remember, your CCR username has been created to match your VPN username. However,
you must use different passwords for each of these services.
Use the VPN password to log into UBVPN, and the CCR password to log into OnDemand!
BEFORE THE WORKSHOP: Workshop setup checklist
Before the workshop begins, please ensure that you have:
- installed the provided UB VPN software on your own computer
- signed into the UB VPN software
- logged on to CCR and changed your CCR password
- verified your access to OnDemand at CCR (see OnDemand section below)
Once you have been through these steps, you are ready for the workshop!
Need help? Get stuck? Please submit a ticket: ccr-help@buffalo.edu
Quick Setup at CCR
This quick setup will prepare your account, settings, and directories for the workshop. We will walk through these steps together in the introductory workshop session.
Workshop computing setup slideset
- Connect to UB VPN
- Sign in to OnDemand: https://ondemand.ccr.buffalo.edu
-
In the OnDemand window, click
Clusters -> Faculty Cluster Shell Accessto open a shell, as shown in the screenshot: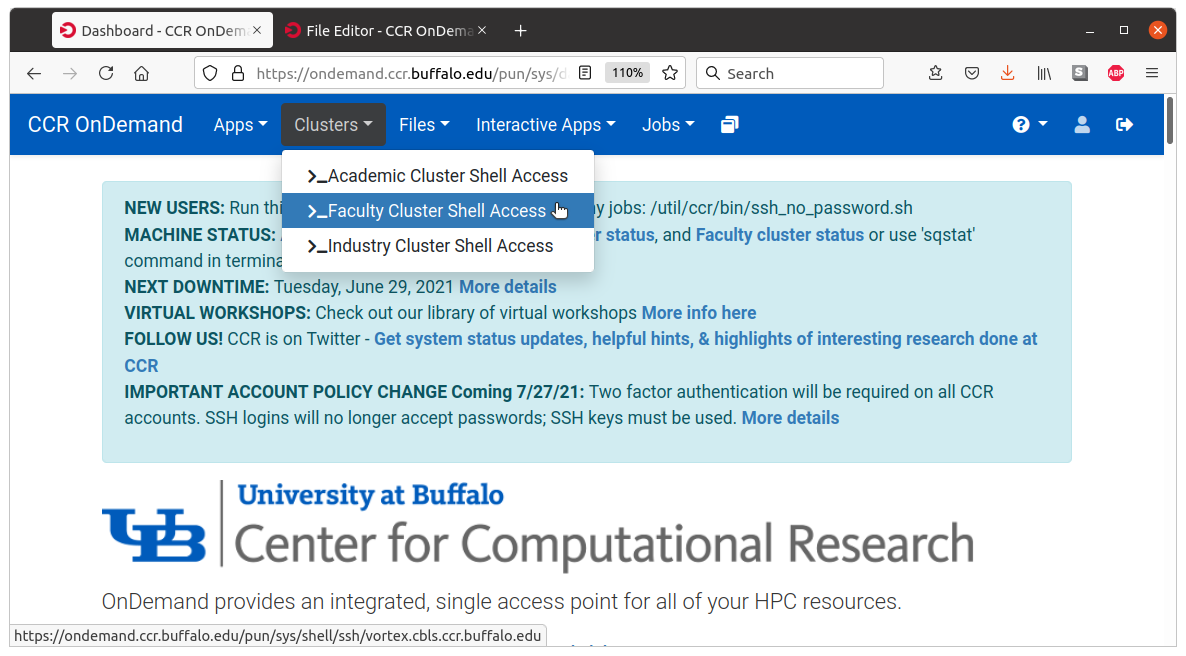
Then perform steps a. to d. outlined below.
a. First time OnDemand access
Run this command in the terminal:
/util/ccr/bin/ssh_no_password.sh
b. Link to project space
Create a link from your home directory to the project space by typing the following:
ln -s /projects/academic/cyberwksp21 ~/workshop
c. Create your project and scratch subdirectories
We now create directories for your own use during the workshop. These directories will have your own CCR username.
Create your Student directory from the command line by typing:
mkdir -p /projects/academic/cyberwksp21/Students/$USER
Create your scratch directory from the command line by typing:
mkdir -p /panasas/scratch/grp-cyberwksp21/$USER
d. .bashrc edits
Two simple additions to your .bashrc file are needed to simplify access to the cluster and to the workshop software modules. You can use nano or vim editors for this task. We will demonstrate with nano, below.
From your home directory (Such as /user/ub2999, if you are user ub2999), type:
nano .bashrc
Use the arrow keys to move the cursor in nano. Add the following two lines to your .bashrc file:
module use /projects/academic/cyberwksp21/Modules

export SLURM_CONF=/util/ccr/slurm/slurm-faculty.conf
Click ctrl-S to save, then ctrl-X to exit the nano editor. Then:
source .bashrc
1. User, project, and scratch space
As a workshop participant you have been allocated a CCR username and account. This provides a home directory on CCR’s high-performance computing resources and access to software and compute nodes there. Here we summarize the directories you will use.
Home directory
Your CCR username will be something like ub2999. For that username, your home directory at CCR
would be:
/user/ub2999
In your home directory, you are allotted 10GB of space for the duration of the workshop.
Project directory
In addition to your home directory, you have access to the workshop directory:
/projects/academic/cyberwksp21
This workshop directory contains the following sub-directories:
-
Instructors_materialContains the examples or working data for the tutorials. You can access it to copy the content you need, but Do not edit or view files in this directory at any time. You can stilllsdirectories to see the content, but do notvithe files. You may accidentally edit or change the files, which may affect other users, so please be mindful. -
ModulesContains modulefiles, which are definitions and setups of the environmental variables for all users. -
SoftwareContains the installations of some packages, such as Conda (with the corresponding environments), or Libra. Do not edit or view files in this directory at any time. You canlsandcdthere, to explore the content of directories, but do not operate on files. -
StudentsWe will create your own directory in this folder. The name should match your CCR username. If your CCR username isub2999, your directory should be:/projects/academic/cyberwksp21/Students/ub2999This will be your working directory (apart from your home directory). This is where you can keep your data and run some (small) calculations. Data in this directory are shared among the participants (those who have access to the UB resources), so you can take the advantage of that: e.g. if something doesn’t work, you may check our outher students’ directories, but again - Do not edit or view files in other students’ directories at any time
Scratch space
In addition to the directories above, you have access to the workshop scratch directory:
/panasas/scratch/grp-cyberwksp21
This directory is useful for writing temporary files or results. We will create a directory there
for your own use. If your CCR username is ub2999, your scratch directory should be:
/panasas/scratch/grp-cyberwksp21/ub2999
2. About Open OnDemand
Open OnDemand is an open-source application that enables access to high-performance computing resources through a web portal (or “gateway”). We will use it to run both Jupyter Notebooks and command line sessions during this workshop.
To access the portal, first ensure you are connected to the UB VPN, then, log in to CCR OnDemand
For detailed step-by-step instructions for logging into the OnDemand system, and information about the available tools:
- How to log in
- Using the Files app: transfer, view, and edit files
- Jupyter Notebook app: how to use Jupyter in OnDemand
- OnDemand Faculty Cluster app:
- Video overview
3. Modules at CCR
Software modules allow us to use specialized software packages on the CCR computing cluster. In this section we’ll set up to use modules, and describe how to use them and what they are for.
3.1. Your .bashrc
In order to use our Python installations via Jupyter, you need to edit the .bashrc file in your home directory.
Refer to the Edit .bashrc section for instructions.
3.3. Review available modules
You can see all available software modules (called just “modules”) by typing:
module avail
In particular, as the result of our .bashrc setup steps above, you shall be able to see modules that
are installed both system-wide as well as the ones needed for the current workshop
(defined in /projects/academic/cyberwksp21/Modules)
This screenshot shows modules we will use for the workshop. An “L” next to a module indicates that it is currently loaded in the terminal session.

3.4. Modules cheat sheet
The following module commands will come in handy:
-
to check what modules are available
module avail -
to load a module
module load <module-name> -
to list your loaded modules
module list -
to unload a module
module unload <module-name> -
to find out what does the modules load do (what kind of operations) and where the module is located
module show <module-name>
3.5. Modules for the workshop
Modules are used to set the necessary paths so we can call and use different software packages on the cluster. Here are the modules we will be concerned about in this workshop:
| Package/Module load command | Version | Description |
|---|---|---|
| columbus | 7.0 2017-12-07-bin | COLUMBUS electronic structure calculations package |
| cp2k | 8.1-sse | CP2K electronic structure calculations package |
| dftbplus | 20.2.1-arpack | DFTB+ for TD-DFTB calculations |
| eqe | 0.2.0 | embedded Quantum Espresso, for large-scale subsystem DFT simulations |
| ergoscf | 3.8, without MPI | ErgoSCF: electronic structure calculations package |
| ergoscf-mpi | 3.8, with MPI | ErgoSCF: electronic structure calculations package |
| jupyter | Contains Libra and other Python packages, such as psi4 (for Python), nano-qmflows, qmflows, py3Dmol, imageio, h5py, matplotlib, etc. | |
| lammps | Large-scale Atomic/Molecular Massively Parallel Simulator (LAMMPS), a classical MD code. | |
| nexmd | Intel-mkl | NEXMD package for nonadiabatic dynamics |
| nx | 2.2-B09 | Newton-X package for nonadiabatic dynamics |
| qe | 6.2.1 | Quantum Espresso electronic structure calculations package |
| qxmd | QXMD package for nonadiabatic dynamics |
Example usage:
module load nx
4. Conda and environments
In the workshop we will use conda to control which Python packages are loaded and available. This is important to do when running on the command line. Jupyter Notebooks, however, takes care of this detail for us. This section will show you how to set up conda environments to run from an OnDemand command line.
Note: Here we assume that you have already included the workshop module use line in your .bashrc, as described in
.bashrc setup.
Load jupyter
module load jupyter
This will set up all the paths needed to execute packages such as Libra.
You can check this by entering which jupyter. The system should return:
/projects/academic/cyberwksp21/Software/Conda/Miniconda3/envs/libra/bin/jupyter
Activate conda
Before you can use any of the Conda environments or run/submit scripts from the command line/terminal, you need to activate Conda (don’t worry about this if you are running a Jupyter notebook).
To do this, type in the terminal:
eval "$(/projects/academic/cyberwksp21/Software/Conda/Miniconda3/bin/conda shell.bash hook)"
Now the Conda installation for this workshop will be available, and
the default conda environment, base, will be loaded. You can see this by the (base) that precedes
your system prompt.
You can check the available Conda environments by running:
conda env list
which should give something like this:
base      *  /projects/academic/cyberwksp21/Software/Conda/Miniconda3
libra-plus   /projects/academic/cyberwksp21/Software/Conda/Miniconda3/envs/libra-plus
qmflows      /projects/academic/cyberwksp21/Software/Conda/Miniconda3/envs/qmflows
Notice that the currently active environment is indicated with an asterisk character (*).
You can list the packages included in any available Conda environment by typing:
conda list -n <environment-name>
Specify a conda environment
For our purposes, we want to use either qmflows or libra-plus environments:
conda activate libra-plus
Note that the prompt changes to show the new conda environment.
Now you are ready to use Libra from the command line!
5. Using Jupyter Notebooks on the OnDemand gateway
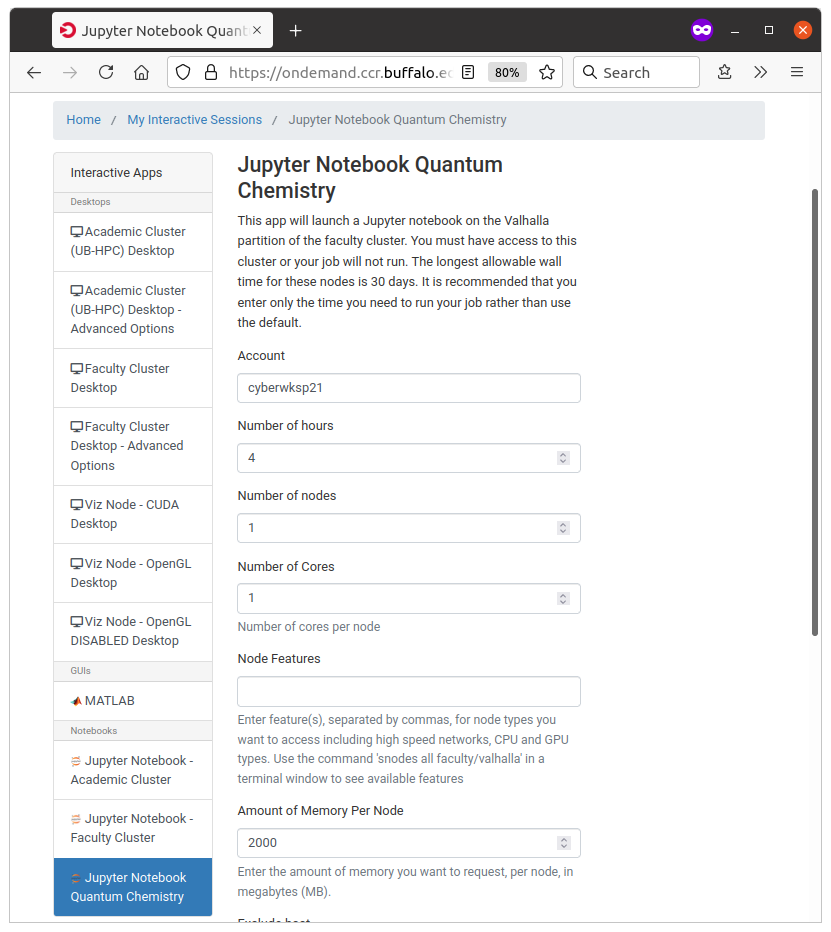
Jupyter Notebooks are a great approach to interactive computing. In the OnDemand environment, your notebook runs right on a CCR compute node, with access to the workshop codes. We need to specify the right parameters so that the CCR resource manager, SLURM, can allocate computing resources to your notebook.
SLURM parameters
Each time you request a SLURM job during the workshop you will specify certain parameters. Notebooks are no different. Use the following to access workshop compute nodes:
| SLURM parameter | value |
|---|---|
| account | cyberwksp21 |
| cluster | faculty |
| partition | valhalla |
| qos | valhalla |
You will also specify the number of hours, nodes, and cores for your notebook:
| SLURM parameter | value |
|---|---|
| Number of nodes | Always select 1 |
| Number of cores | Typically 1, may be more |
| Memory | 2000 (= 2GB) |
| Number of hours | At least 1 hour, can select full day |
5.1. Check your .bashrc file
Make sure you include the module use /projects/academic/cyberwksp21/Modules line in
your .bashrc file (Refer to .bashrc setup, above).
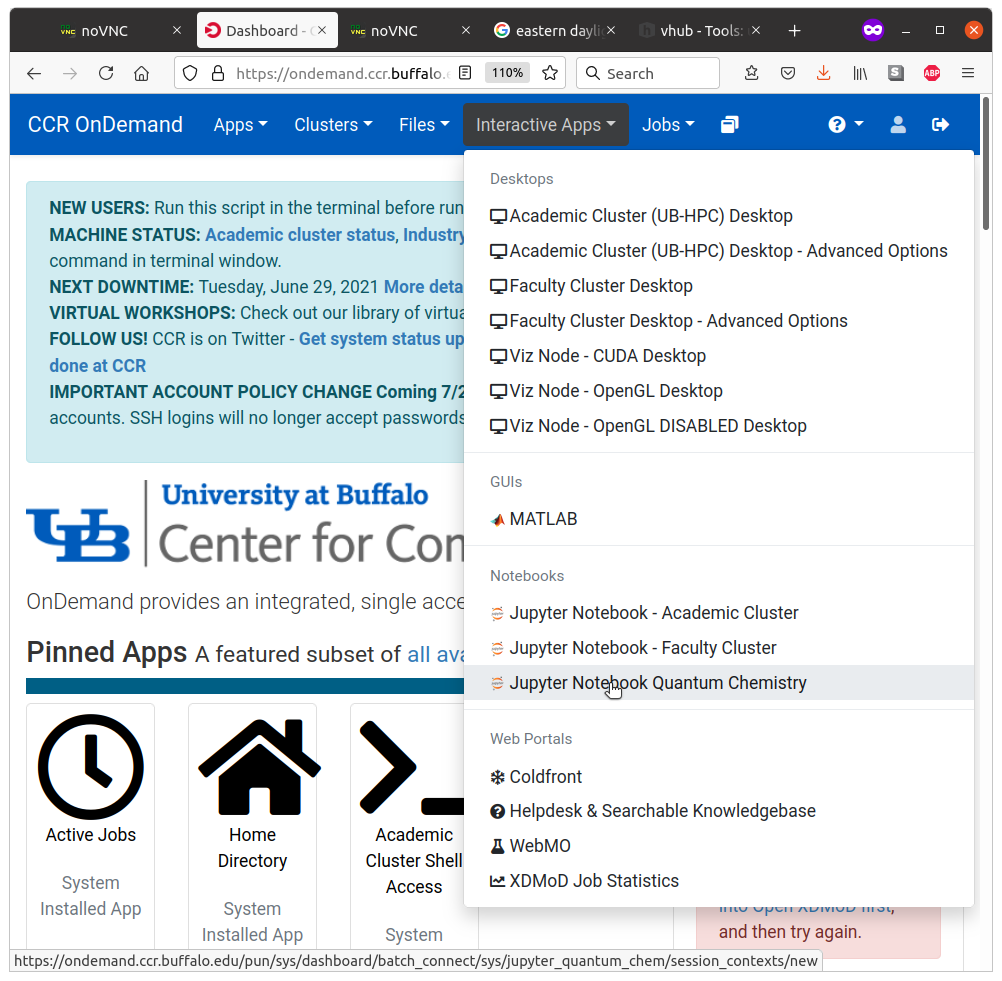
5.2. Start the Jupyter app from the OnDemand Portal
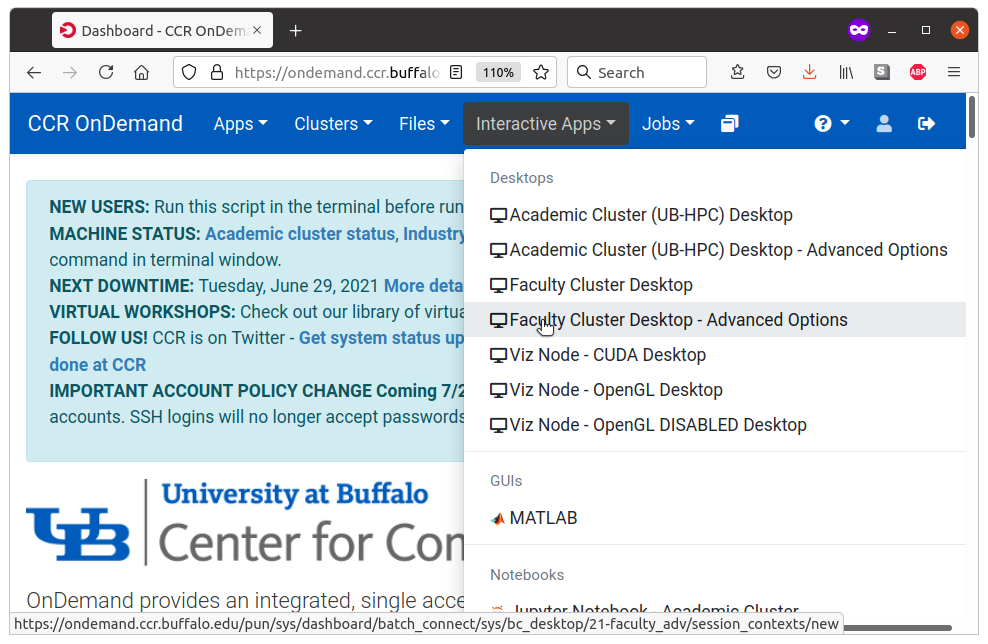
Select Interactive Apps -> Jupyter Notebook Quantum Chemistry
This will create an interactive SLURM job which will allocate time, memory, and resources to run your Jupyter notebooks and the corresponding calculations. Since this is a SLURM job, we still need to do a few more steps: indicate how much time and memory, how many CPUs, and what cluster to use.
During this workshop, we are going to use Akimov’s group computing partition, “valhalla”. Considering we all will need to have a job running, please make sure you select only 1 node (can be more cores, if needed). For Jupyter jobs, we usually don’t need much memory, so 2Gb (2000) should be sufficient. We will also request the job to last for 1 hour (or more). When the time runs out, you can just submit another job, so it is not critical. However, I recommend requesting as much time as you plan working on continuosly.
Here is an example:
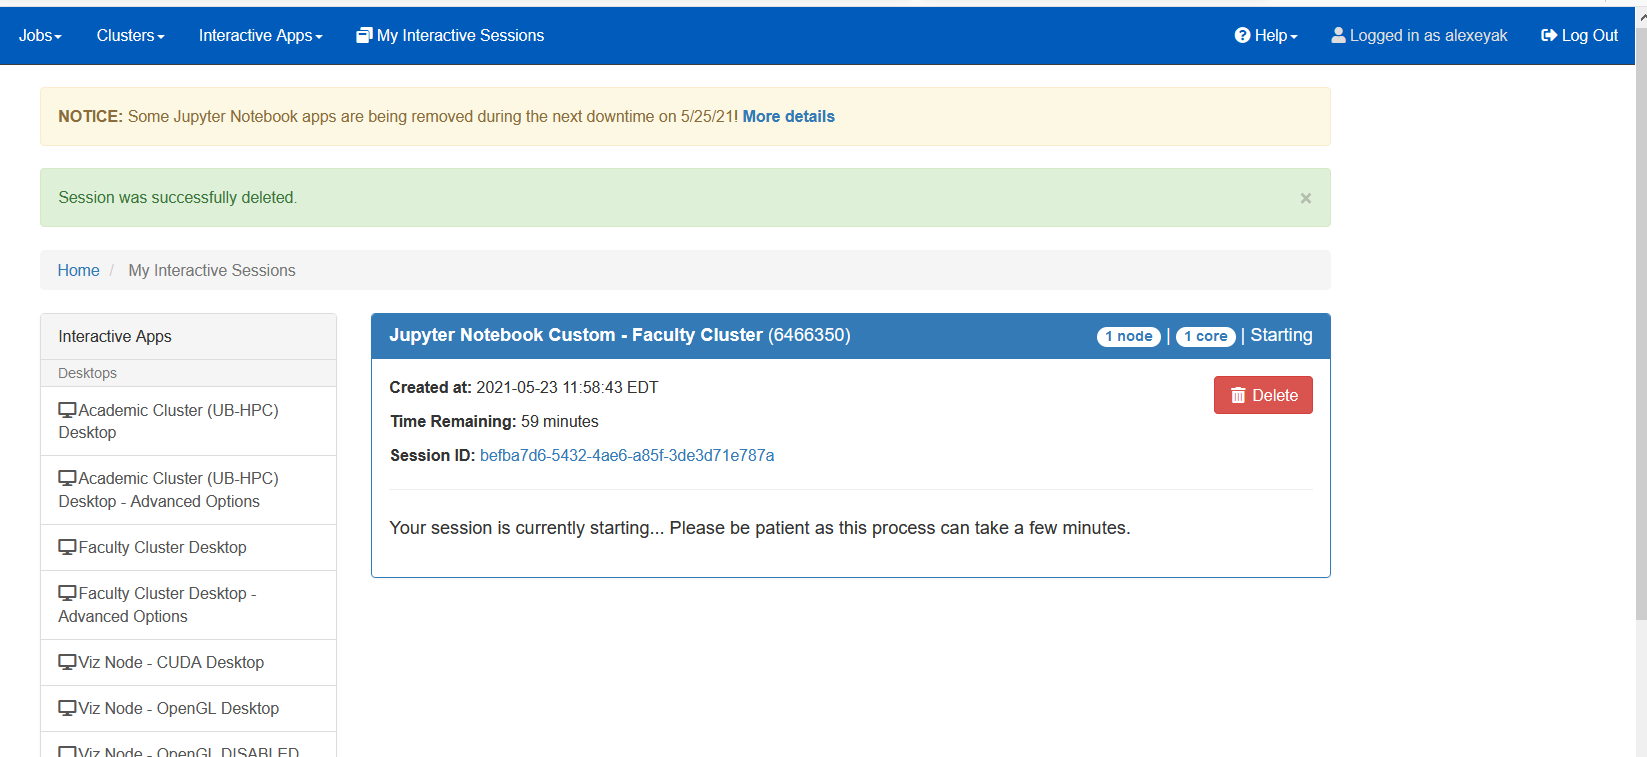
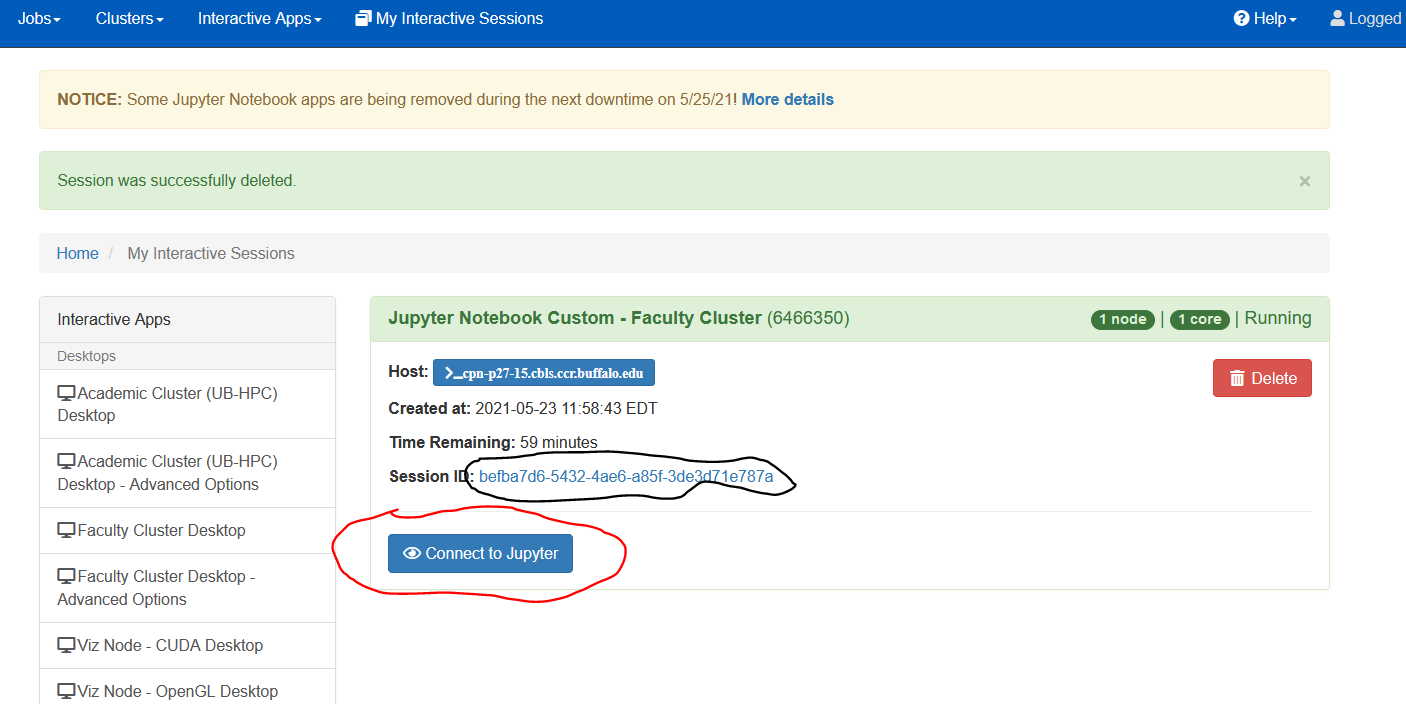
Once done, click “Launch”. You shall be able to see the following results:
You will first see a prompt (table below, left panel) saying that the job is submitted and asking you to wait. It should not take too long to wait, if your request is reasonable (not too many cores/nodes, not too much memory/time). If it takes too long, consider deleting the submitted job (Red “Delete” button) and submitting a new one.
Once the resources are allocated to you, you should be able to start your Jupyter notebook (table below, right panel, red circle). You can also check what’s going on with the job and see additional log and error messages if you click the link indicated (black circle).
Please make sure to Delete the job, if you no longer plan using the notebook in OnDemand. Just closing the browser does not delete the job!
 |
 |
Once your Jupyter job is started, it will provide you with a convenient interface for navigating in your home directory, as shown below.
You can then create new files or folders or open the existing ones.
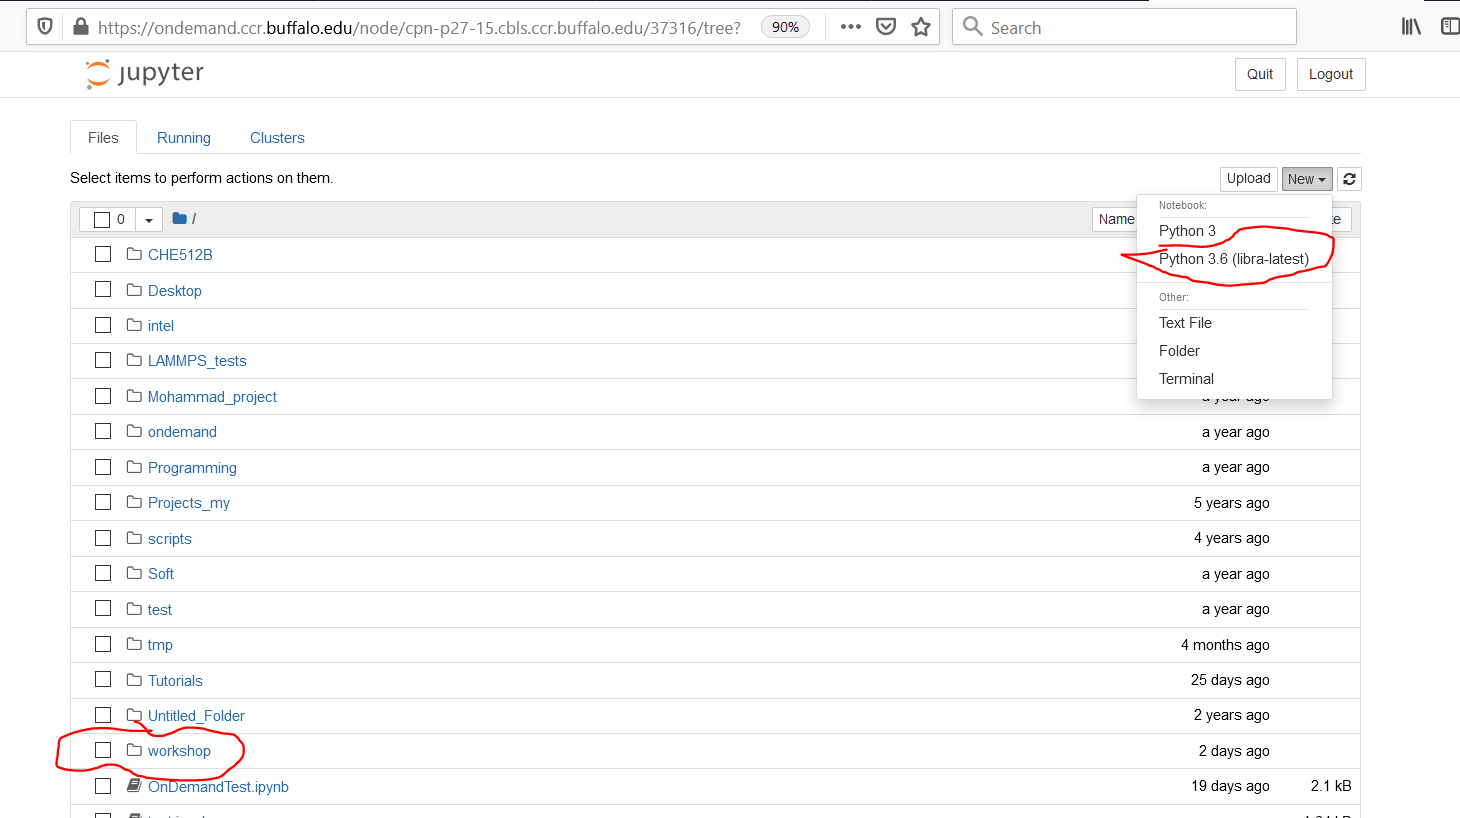
5.3. Creating a new Jupyter notebook
Go to New -> Python 3.6 (libra-latest) to create a new Jupyter notebook. By selecting the
“Python3.6 (libra-latest)” kernel, you will have access to the pre-installed environment with
Libra and other dependencies (libint2, py3Dmol, psi4, etc.)
5.4. Symbolic link to project space
When you start the Jupyter notebook app, you will only have access to your home directory. For this workshop, it will be useful to keep working files in /projects/academic/cyberwksp21/Students/<yourid>
To easily access this directory, create a soft link in your home directory:
ln -s /projects/academic/cyberwksp21 ~/workshop
Now, you can use the workshop link to easily access all of your files located in the workshop project space. (see the red circle at the
bottom of the above picture).
5.5. Changing the kernel for an existing notebook
Most workshop notebooks require either the libra-latest or qmflows Python 3 kernels.
When you open an existing Jupyter notebook (e.g. one of the examples), it may be pointing to the default Python 3 kernel, which doesn’t have the needed libraries.
In this case, you simply need to choose the kernel manually:
Kernel -> Change kernel -> Python3.6 (libra-latest)
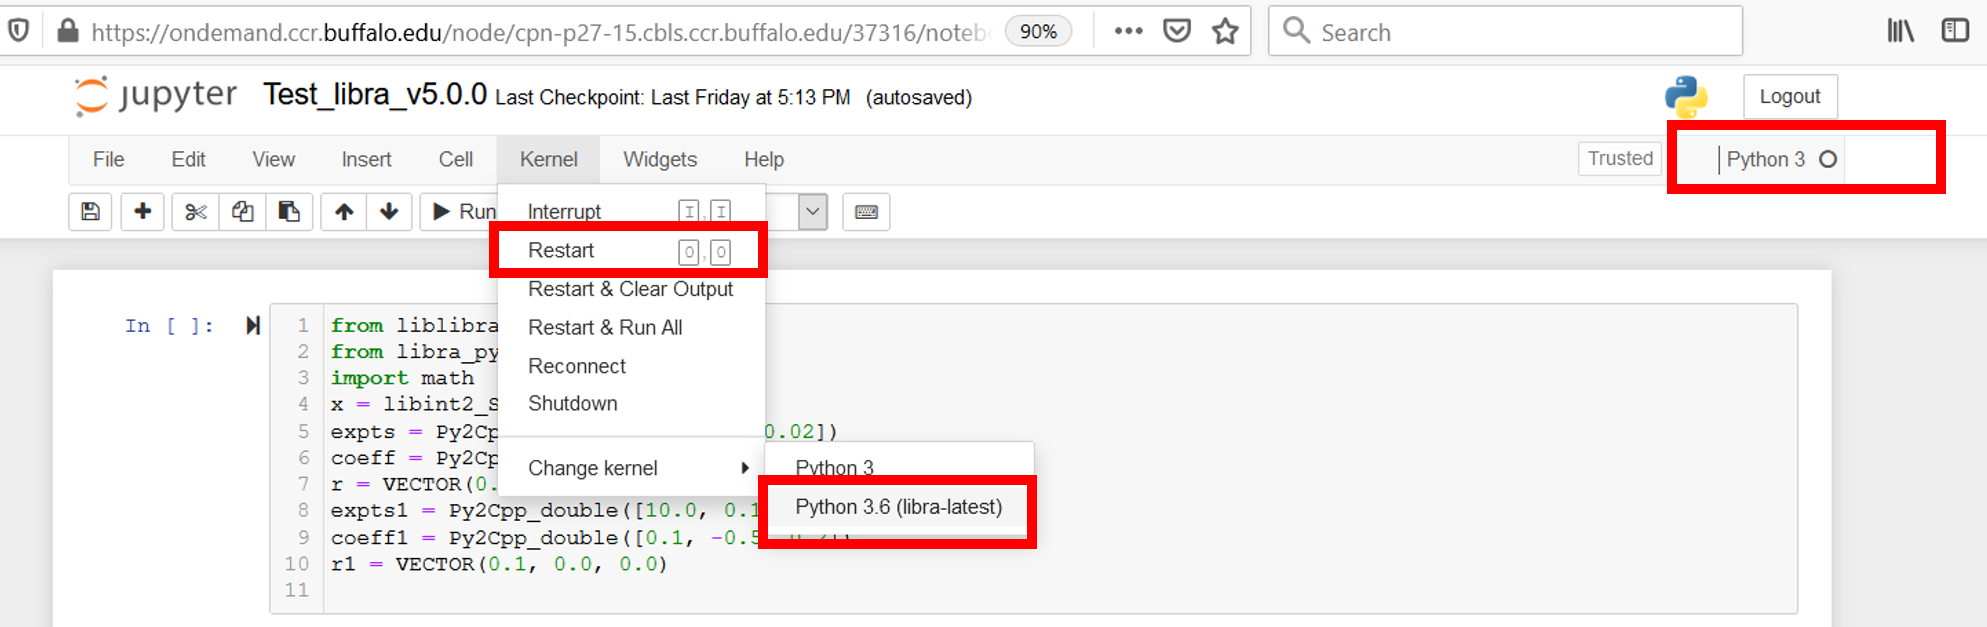
You can click Kernel -> Restart if it doesn’t restart automatically (you may see a message
in the top right corner, next to the name of the currently loaded kernel).
Click the Save icon (or File -> Save) to ensure your kernel choice is saved in the notebook.
6. Running interactive jobs on the OnDemand gateway
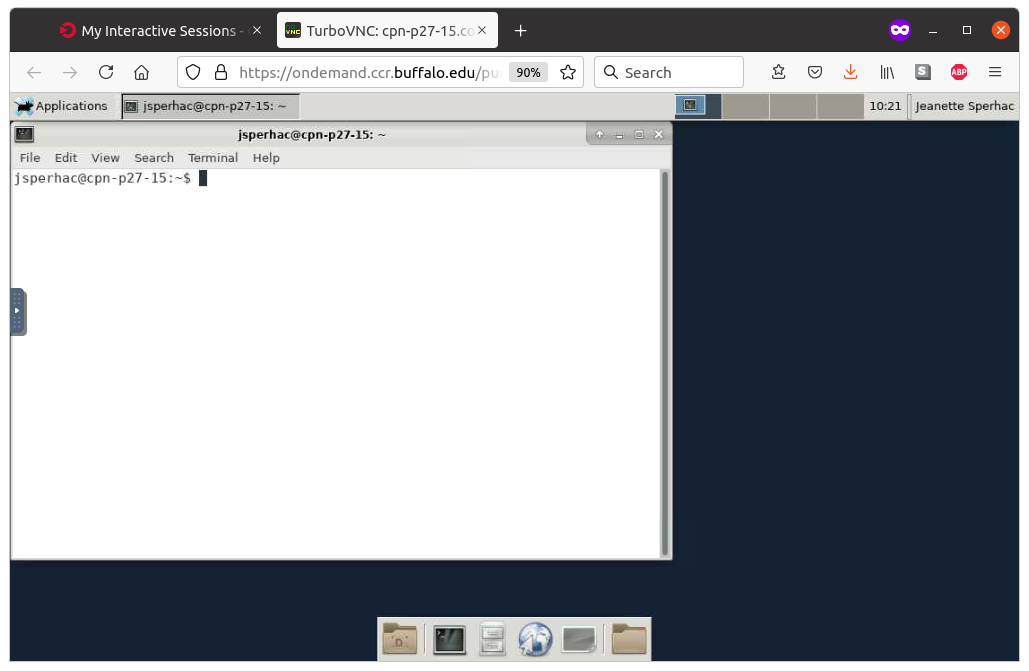
To run interactive jobs from OnDemand we will run the Faculty Cluster Desktop Advanced app. While running this app you have access to part of a node on the valhalla partition at CCR.
Each valhalla computing node has 12 or 24 cores. Note that the Faculty Cluster Desktop Advanced enables you to select a subset of the cores on the node, which will be sufficient for workshop tasks. Your instructor will tell you how many cores to request (most likely 4).
Since all workshop attendees share computing resources, we will select Advanced and share these nodes!
Documentation for this app: OnDemand Cluster Desktop
To start it, sign in to OnDemand, then select Interactive Apps -> Faculty Cluster Desktop - Advanced Options.
6.1 Requesting resources from SLURM
The Faculty Cluster Desktop Advanced app reserves part of a computing node for your interactive jobs. You specify the parameters that will govern your jobs. These parameters will be sent in a request to the cluster resource manager SLURM.
Please make sure to Delete the job, freeing these resources, if you are finished using the app in OnDemand. Just closing the browser does not delete the job!
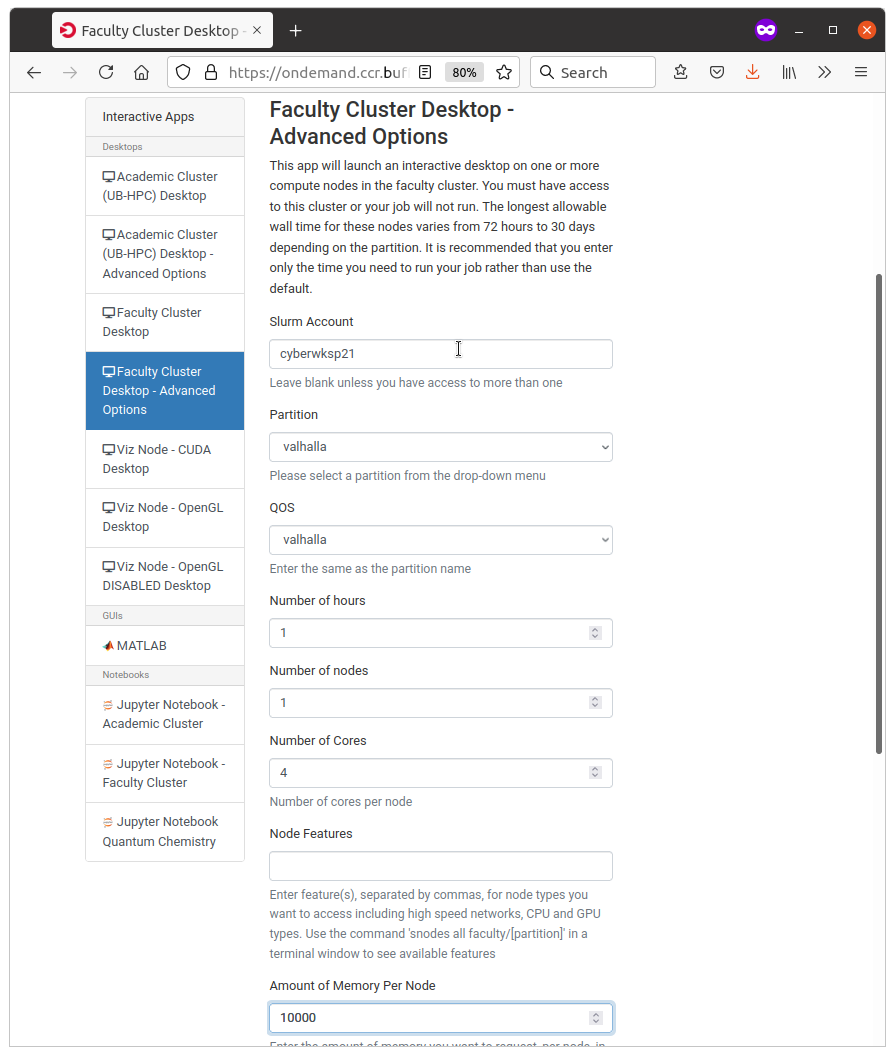
Specify the SLURM parameters in the user interface. You will request:
| SLURM parameter | value |
|---|---|
| SLURM Account | cyberwksp21 |
| Partition | valhalla |
| QOS | valhalla |
| Number of hours | 1 or more |
| Number of nodes | Always select 1 |
| Number of cores | 4 (or as suggested by instructor) |
| Memory | (Optional–as suggested by instructor) |
Then, click Launch to submit your request.
OnDemand will send your request to SLURM, which will prepare the resources for your job. OnDemand will display the status of your request, as shown on the left.
When the resources are ready, you will be prompted to launch the desktop by clicking “Launch Faculty Cluster Desktop - Advanced”, as shown on the right.
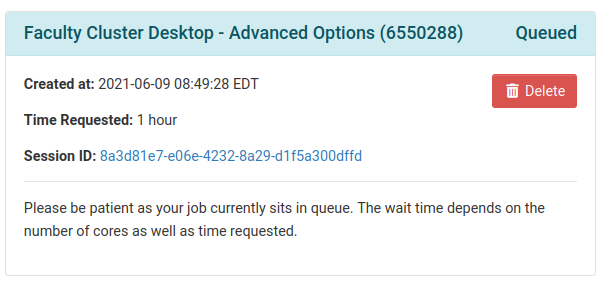 |
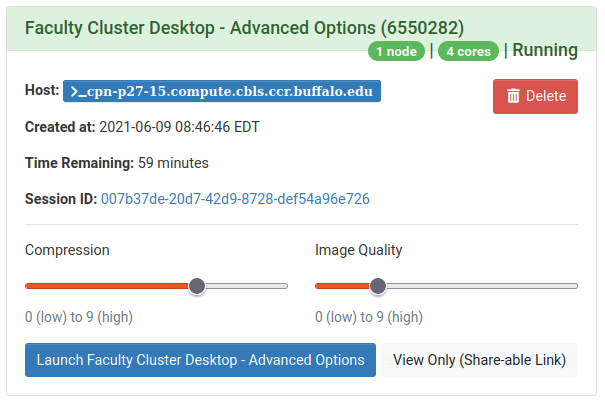 |
Once you are running the Desktop app, click the blank terminal icon, as shown left, to start a terminal emulator. The terminal will run directly on your requested compute node, as shown right.
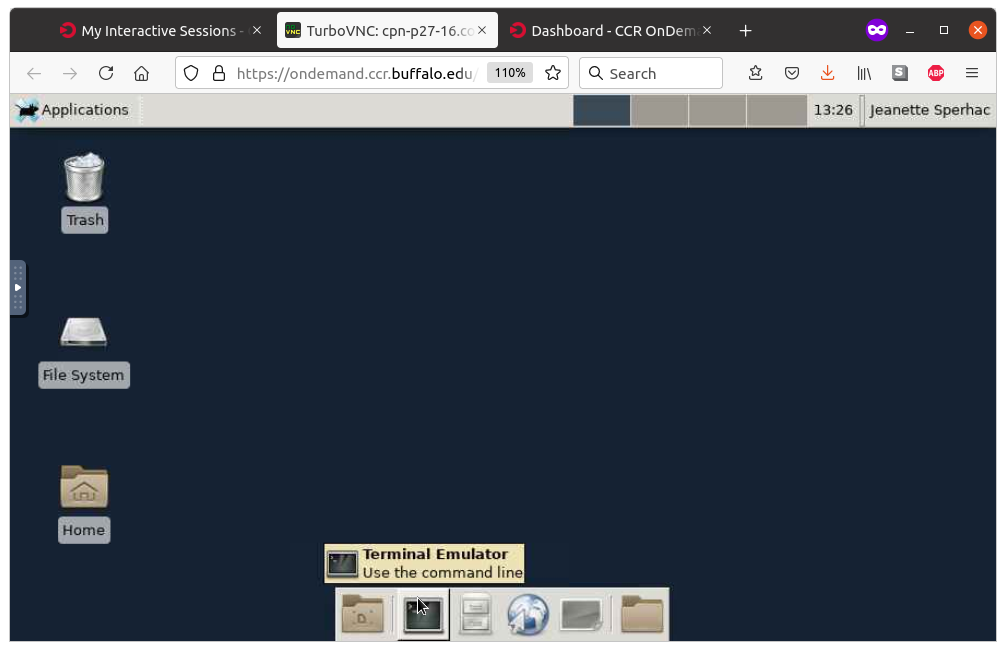 |
 |
You are now running the Desktop app. A bit more setup, described below, will prepare the app so you can run interactive jobs in this workshop.
6.2. Load jupyter
Note: Here we assume that you have already included the workshop module use line in your .bashrc, as described in
.bashrc setup.
In the OnDemand Faculty Cluster Desktop (Advanced), click the terminal icon to start a terminal emulator. Then, on the terminal command line, type:
module load jupyter
This will set up all the paths needed to execute packages such as Libra.
To verify the correct setup, entering which jupyter will return:
/projects/academic/cyberwksp21/Software/Conda/Miniconda3/envs/libra/bin/jupyter
6.3. Activate conda
Before you can use any of the Conda environments or run/submit scripts from the command line/terminal, you need to activate Conda. To do this, type in the terminal:
eval "$(/projects/academic/cyberwksp21/Software/Conda/Miniconda3/bin/conda shell.bash hook)"
Now, the Conda installation for this workshop will be available, with the base environment activated.
You can check the available Conda environments by running:
conda env list
which should show you something like this:
base      *  /projects/academic/cyberwksp21/Software/Conda/Miniconda3
libra-plus   /projects/academic/cyberwksp21/Software/Conda/Miniconda3/envs/libra-plus
qmflows      /projects/academic/cyberwksp21/Software/Conda/Miniconda3/envs/qmflows
Notice that the currently active environment is indicated with an asterisk character (*). By default, your current environment will also be shown by name in parentheses at the beginning of your command prompt.
You can list the packages included in any of the available Conda environments this way:
conda list -n <environment-name>
6.4. Activate a conda environment
For the workshop, we typically use either qmflows or libra-plus environments. To activate
libra-plus, type:
conda activate libra-plus
6.5. Load additional modules
You can now load any other modules you need for your command line work. Refer to the Modules section above for more information.
6.6. Summary: interactive jobs setup: Cluster Desktop app
Here we summarize the steps to prepare for interactive work on the OnDemand Cluster app.
- Ensure you are signed onto the UB VPN. Sign on to
https://ondemand.ccr.buffalo.eduusing your CCR account and password.
Note: Here we assume that you have already included the workshop module use line in your .bashrc, as described in
.bashrc setup.
-
In the OnDemand user interface, select App: Faculty Cluster Desktop (Advanced) and specify the SLURM parameters for the job.
-
When the Desktop app is ready, click Launch Faculty Cluster Desktop (Advanced) and then start a Terminal Emulator.
-
From the terminal command line, load jupyter and enable conda:
module load jupyter

eval "$(/projects/academic/cyberwksp21/Software/Conda/Miniconda3/bin/conda shell.bash hook)"
- Now you can activate a conda environment, such as:
conda activate libra-plus
- Additional software modules (see Modules), can be loaded, such as:
module load qxmd
Now you are prepared to run interactive jobs in the OnDemand Faculty Cluster Desktop (Advanced) app!
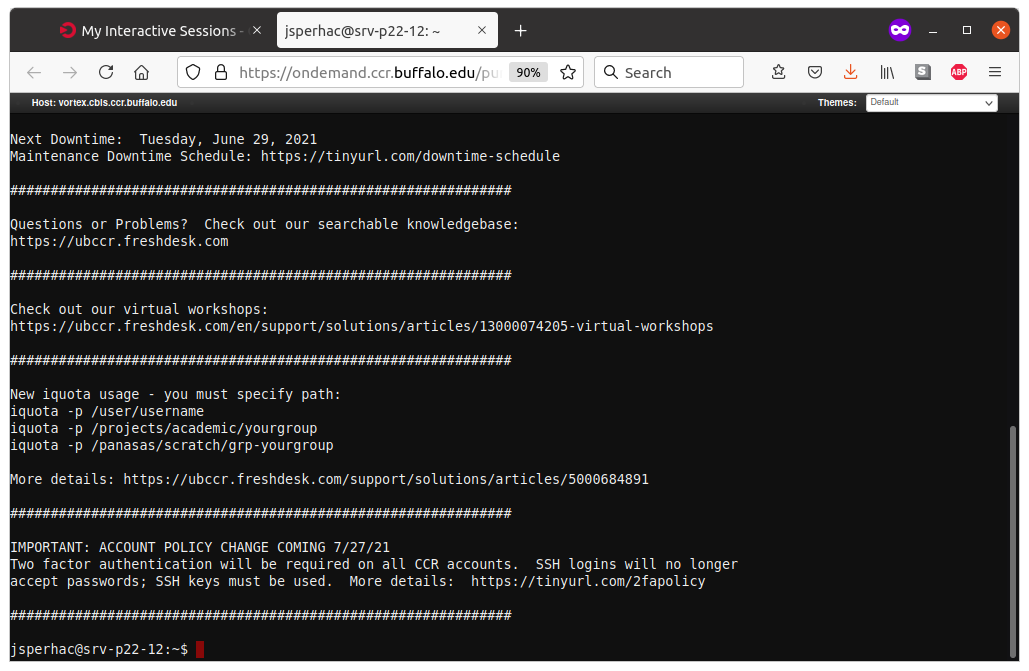
7. Running the shell on the OnDemand gateway
To run the command shell from OnDemand we will run the Faculty Shell app. While running this app you have access to one of the login nodes at CCR.
In order to run a job from the shell, you must submit a SLURM script that requests the workshop’s Partition, Account, and QOS.
Documentation for this app: OnDemand Cluster Shell App
To start it, sign in to OnDemand, then select Clusters -> Faculty Cluster Shell Access.
You are now running the shell. A bit more setup, described below, will prepare the app so you can submit SLURM jobs for this workshop.
7.1. Setup: Faculty Shell
Here we prepare the Faculty Shell for work on OnDemand app. Setup is much the same as we have seen in the Faculty Cluster App.
Note: Here we assume that you have already included the workshop module use line in your .bashrc, as described in
.bashrc setup.
- From the shell command line, load jupyter and enable conda (see Conda):
module load jupyter

eval "$(/projects/academic/cyberwksp21/Software/Conda/Miniconda3/bin/conda shell.bash hook)"
- Now you can activate a conda environment, such as:
conda activate libra-plus
- Additional software modules (see Modules), can be loaded, such as:
module load qxmd
Now you are prepared to submit batch jobs in the OnDemand Faculty Cluster Desktop (Advanced) app!
7.2 SLURM parameters
The Faculty Shell places you on a login node at CCR with access to the Faculty cluster. To run a job you must now request workshop resources from the computing resource manager, SLURM. Since we are on the Faculty Shell the system automatically sets the SLURM parameter –clusters=faculty for us.
You will specify the SLURM parameters in a SLURM script. At a minimum, you will request:
| SLURM parameter description | Parameter name (srun) | value |
|---|---|---|
| SLURM Account | -A or –account | cyberwksp21 |
| Partition | -p or –partition | valhalla |
| QOS | -q or –qos | valhalla |
8. Useful References and Slidesets
- CCR overview slideset
- Intro to CCR and OnDemand slideset
- Workshop computing setup slideset
- CCR/SLURM Links and information
About High Performance Computing (HPC) at CCR
Table of Content
CCR Faculty Cluster
Here is some information about the faculty cluster at CCR, where we will run all our jobs in the workshop:
Open OnDemand at CCR
Some CCR documentation describing Open OnDemand and its use:
-
Open OnDemand general info
-
OnDemand Jupyter Notebooks
-
OnDemand Faculty Shell
About SLURM
Some information about SLURM, the Simple Linux Utility for Resource Management used to schedule jobs and manage the computing cluster:
Using SLURM
How to use SLURM: sbatch, salloc, srun:
Checking job status
Query available resources, check status of your own jobs:
-
Querying available resources: snodes
Useful
Need help?
CCR Freshdesk ticketing system
Or email us at: ccr-help@buffalo.edu
Join us on the workshop Slack channel:
quantumdynamicshub.slack.com
Key Points